A user guide to the VTF MIP map and sharpen filters of VTFLib & VTFEdit.
Last update: 25 March 2008
A question I get asked frequently is "What exactly is the difference between all the different filters in VTFEdit and the Photoshop VTF plugin?" followed by "And which one should I use?"
It’s a good question actually – VTFLib, the core of all Nem and I’s VTF applications offers fourteen different MIP map filters along with twelve useable sharpen filters. Compared to the single default "NICE" filter that comes with Valve’s own VTex application it certainly gives you more to choose from.
This short article will hopefully provide some info as to what the filters are, what they do and help you choose which combination of MIP and sharpen filters are best for your application.
But I’ve only got five minutes!
O.K. O.K. If you’re reading this article you’re more than likely a creative/artistic type so the math and science behind it are probably of very little interest to you. After all, Fournier transforms don’t really impress the ladies do they?
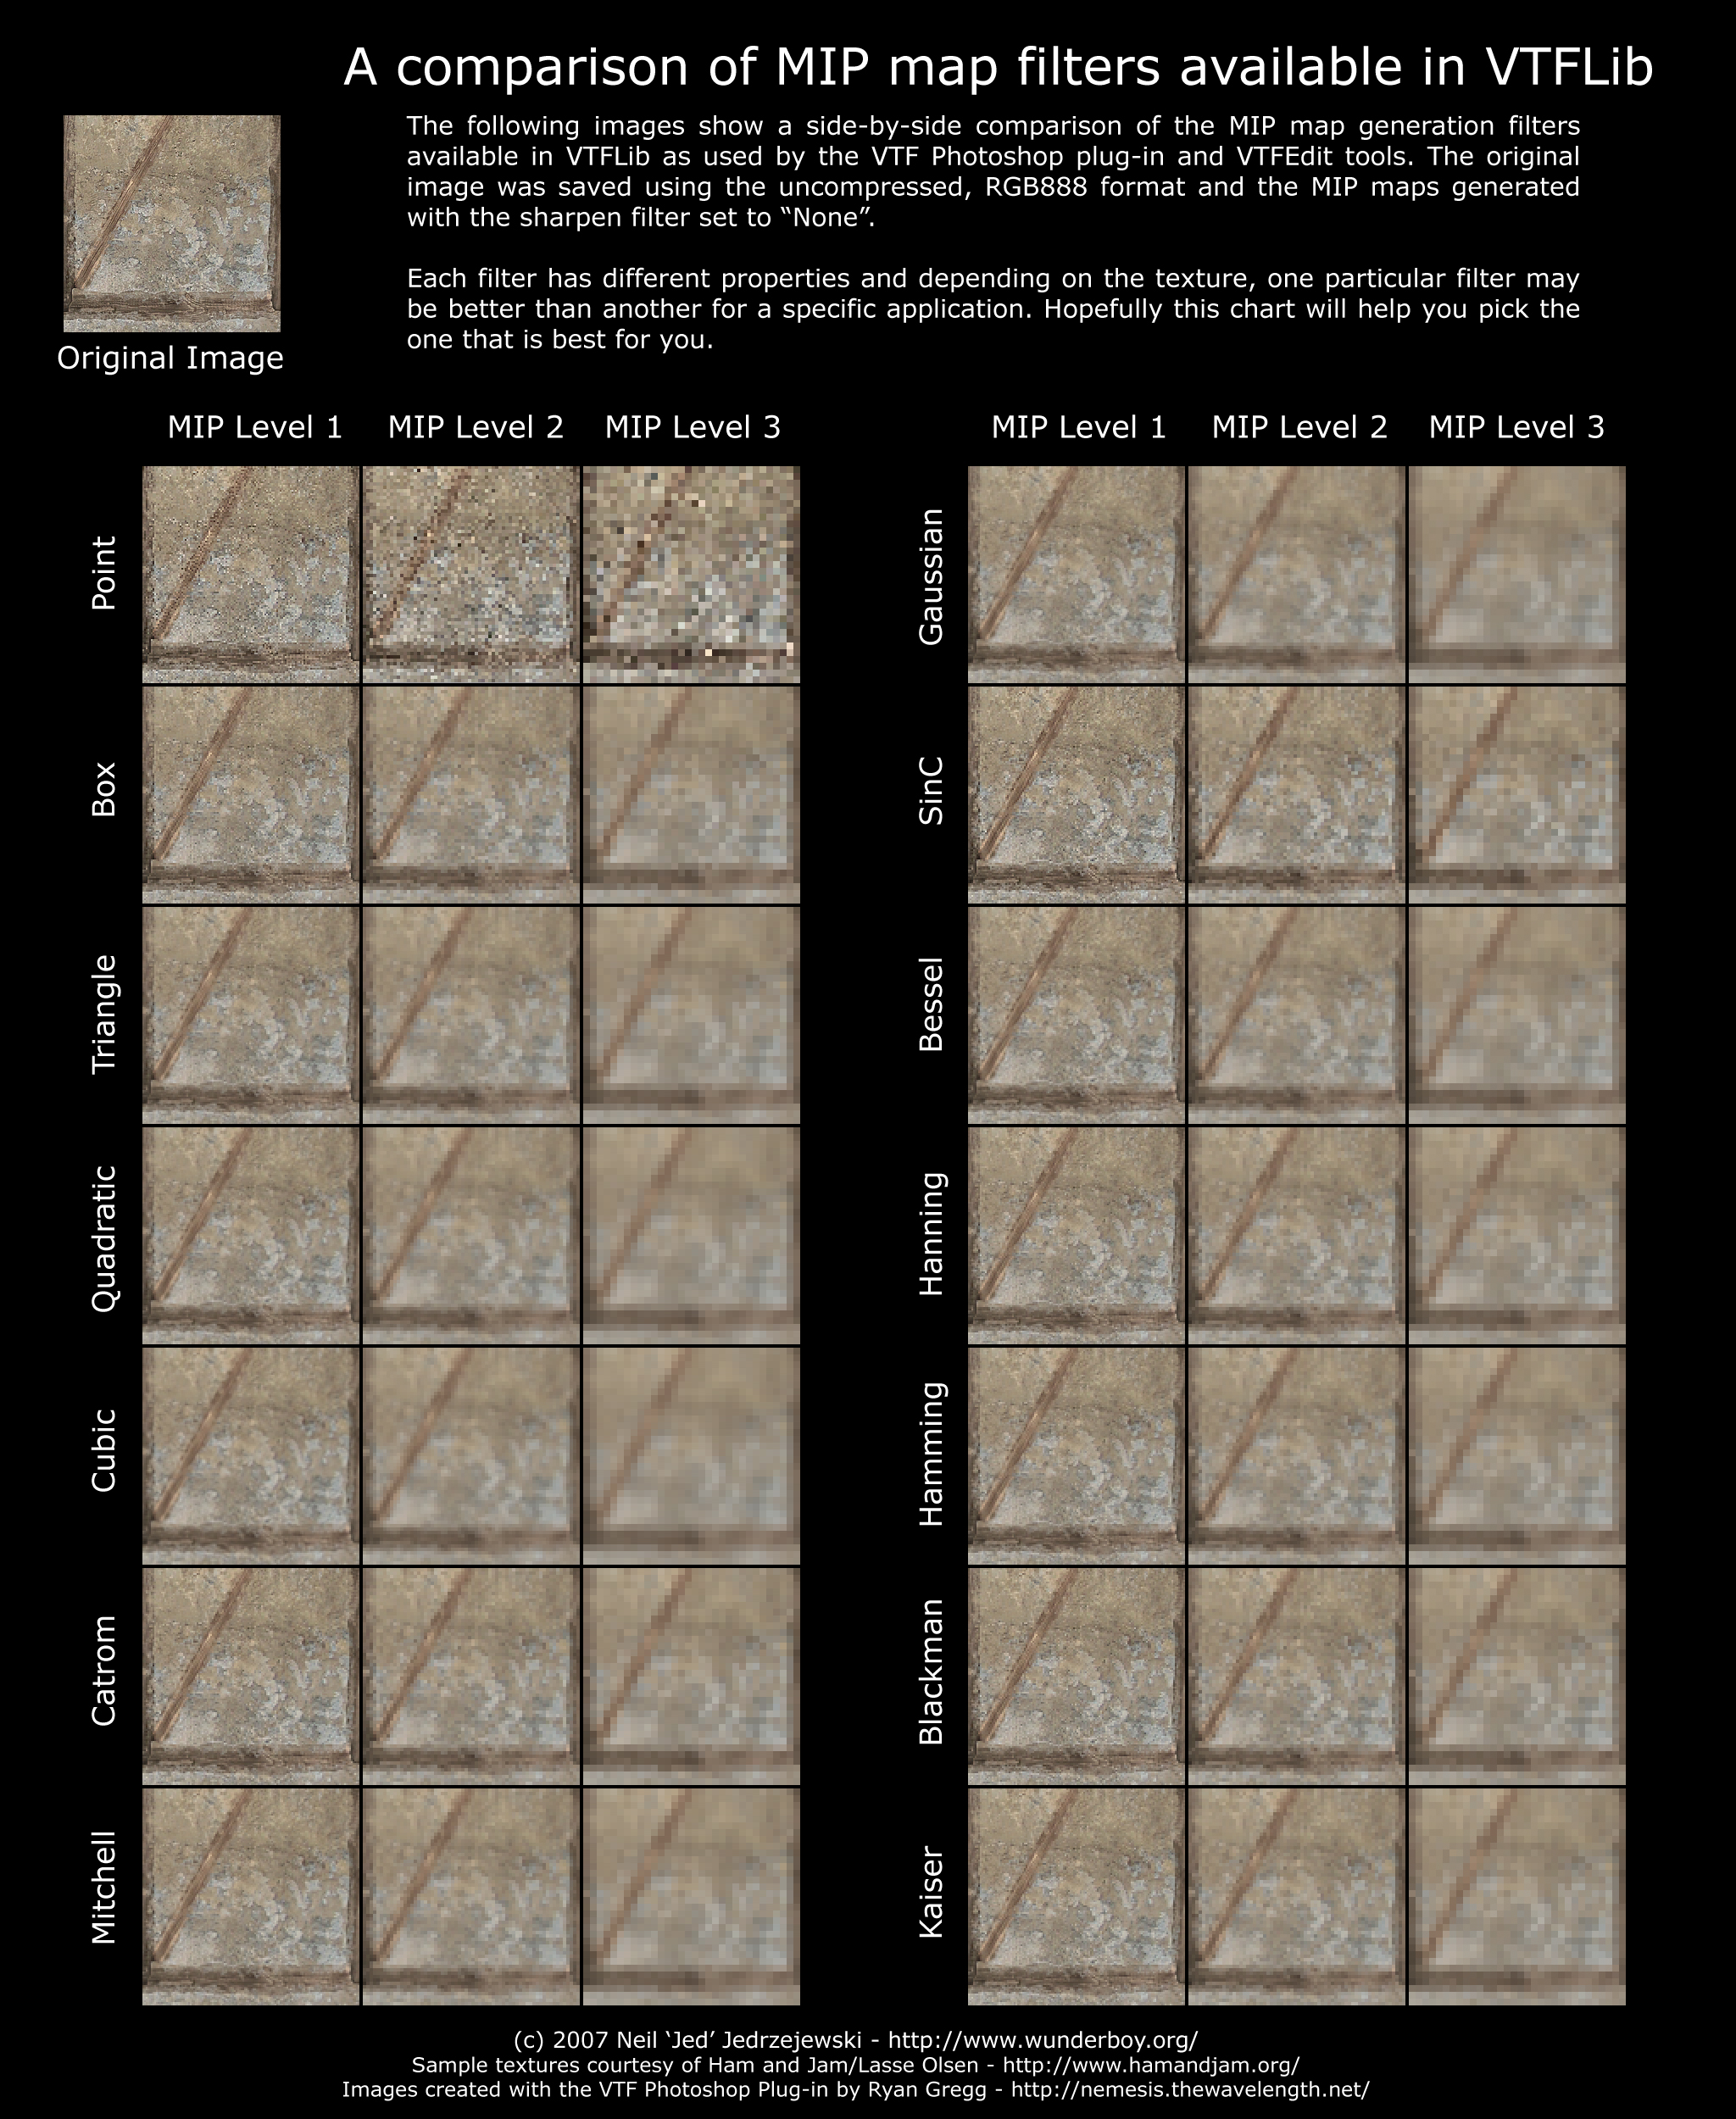
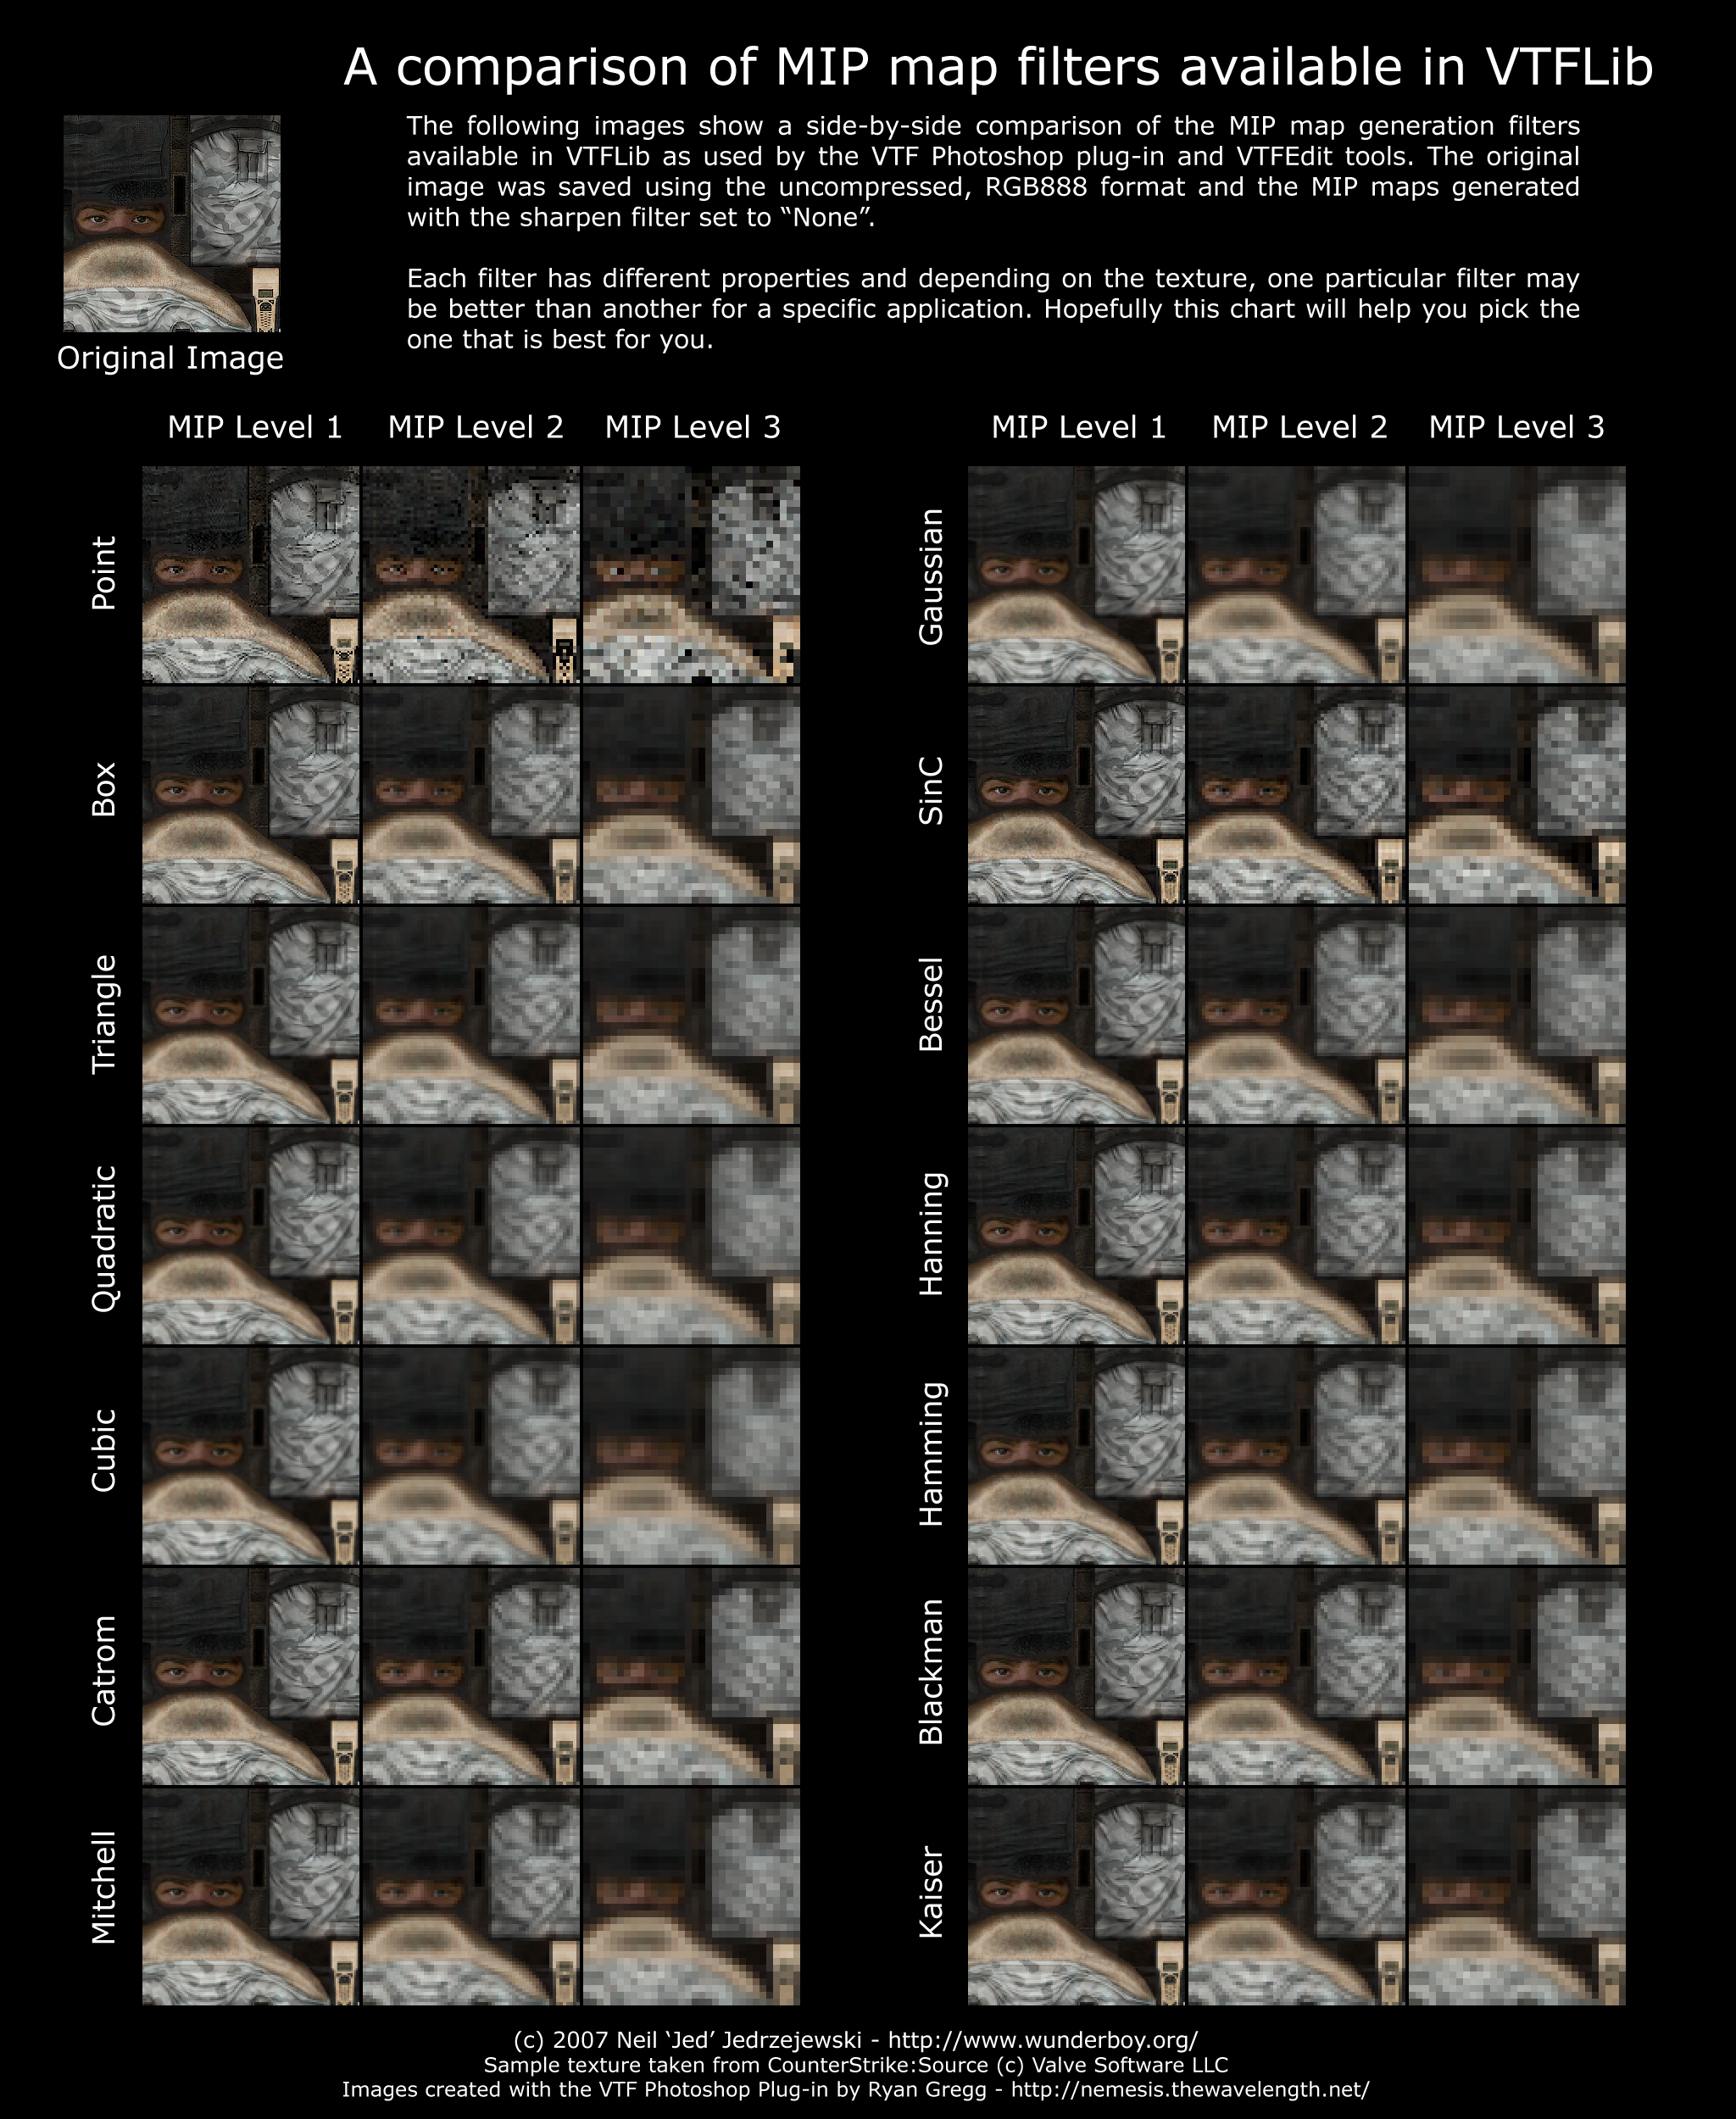
Short version: People often make the mistake of thinking that the filters in the VTF tools are ordered worst top, best bottom. This is kinda true but each filter has different properties when it comes to how it filters the image. One filter might be great for a dirt texture but blur the detail of a human face completely.
Note: The original texture is never filtered, only the MIP maps and each MIP texture is made from the original image, not the level preceeding it. Sharpen filters are applied to the MIP texture after it has been resized with the MIP filter you chose.
Below is a series of JPEG images showing how the MIP map filters in VTFLib effect different types of images. It’s meant to be a quick reference guide only so you’ll have to try them out with your own image and decide which best suits your texture yourself.
The textures are fairly large so you will probably need to zoom in or open them in an image viewer to get the best results.
The following image shows how the sharpen filters effect MIP textures after they’ve been generated. We only show the filters that show a useable result – some filters are buggy or produce only a black or white image.
So what filter should I use? Whats the difference?
What’s best is really down to you and what you want to achieve with your textures.
Remember that the whole point of MIP mapping is to remove artifacts caused by aliasing. As things get further away detail is lost, colours blend together and so whacking a sharpen filter on things kind of defeats the purpose. What you’re looking for in a MIP texture is good downsampling, not necessarily detail. If your MIP maps are too sharp they start to look unatural to the human eye.
If I was pressed to give a suggestion I’d say go with a “Box” filter and “Sharpen Soft” sharpening for normal textures. That or “SinC” with no sharpening at all. For normal maps “Mitchell” gives good results but “Catrom” and “Bessel” might be worth consideration too.
This is all personal opinion though. Your mileage may vary.
And now… Science!
If you’re still reading this article then it’s time to get technical and explain how the filters work.
MIP mapping is a well known technique documented in many places so theres no need to go into why we do here here. However, what is relevant is how filters play a part in producing the MIP levels while retaining visual fidelity and quality.

Lets say your original texture is 512×512 pixels we need to halve it for the first MIP level, taking it down to 256×256 pixels. That means you lose 75% of you original texture area. Thats a LOT!™
The simplest way of doing this would be to take every block of 4×4 pixels and reduce it to one by finding the average colour of the four and using that. This is what a simple "box" filter does. It works, but often it creates textures that are very blurry and lacking detail.
Luckily for us, way back in 1805 a clever chap called Carl Friedrich Gauss invented the Fast Fournier Transform, a mathematical method of decomposing sampled functions into a group of sine waves. Effetively pixel information in our texture becomes sine waves which can be filtered in much the same way as say a sound wave can be.
And onto the filters…
Now that we’re thinking of the pixesl in our texture as waves we can use filtering to reduce aliasing artifacts by filtering out sine waves with narrow wavelengths and keeping the broad ones. Sadly we need to delve a bit into science again, but to ease your burden heres a pretty picture.
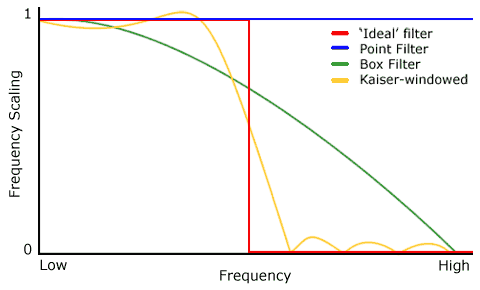
Much like how the equaliser on your stereo filters sound, image filters tune out or boost parts you want. In the diagram above, the red line is an theoretical “Ideal” filter which would give perfect aliasing of your textures keeping all the broad frequencies and discarding the narrow ones. The blue line is a “Point” filter, which as you can see filters out nothing and gives the worst results. Green is our “Box” filter and yellow a typical “Kaiser” filter. Of the three, the Kaiser is the nearest in shape to the red ideal filter.
Well that’s all well and good showing pretty graphs but how does it affect the look of our texture when downsizing for MIP maps?

Looking at the above we can see that the “Point” filter hasn’t helped much and our textures would look just as bad if they hadn’t be filtered at all. The “Box” filter is pretty O.K. and is quite sharp but theres still some jaggedness to some areas of the texture. The “Kaiser” filter however has done a very good job at producing a nice smooth downsampled texture.
![]()
![]()
![]()
![]()